Users that have been assigned the role of a User Administrator (see "User Roles") can access the User Management through the Navigation menu in the top navigation bar. When doing so, the entry screen will show the User Dashboard, giving details about the current number of users, the distribution of analyst and viewer licenses and the license currently used for accessing SAP Process Mining by Celonis . From here, User Administrators can enter the two areas “Manage Users” and “Manage Groups” by clicking on the respective button in the top right corner of the entry screen.
The main page of the User Management is structured as in Figure 5.1. You can see all registered users, as well as their permissions (see User Roles).
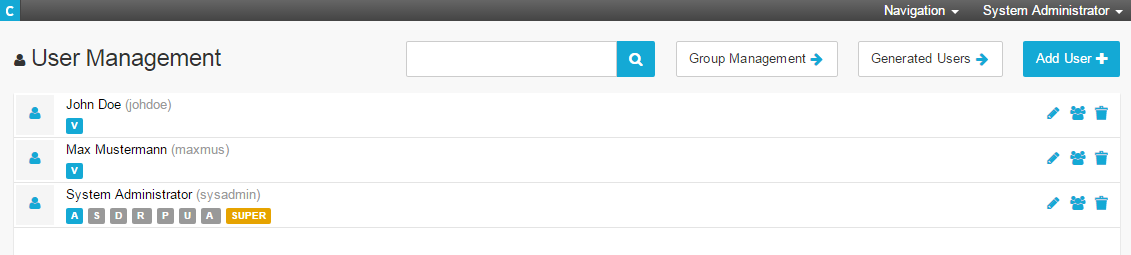
Figure 5.1: User Management
Create a new user
Click on "Add User" in the top right corner of the page.
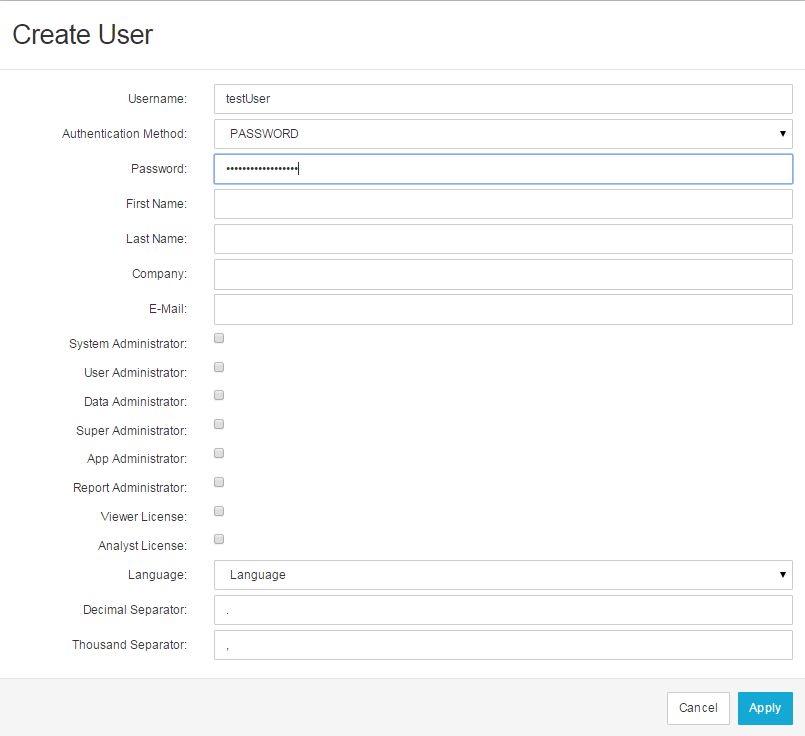
Figure 5.2: Create a new user
When creating a new user, you need to give at least a Username in order to be able to save the newe user. However, for the new user to be able to properly use the SAP Process Mining by Celonis system, some additional information should be given.
Login Details
- Username: Specify the username. The value entered here will also be used for logging into the system.
- Password: Assign a password for the user. The password is needed for Login if the Authentication Method is set to “Password”.
- Authentication Method: Choose the method of authentication for the user. There are four options available: “Password”, “HTTP Header”, “LDAP” and “Disabled”. When “Password” is chosen, the password specified in the previous field will be needed for Login.
Personal Details
- First Name: Enter the First Name of the user. A combination of First Name and Last Name will be shown for entering the user menu explained in The User Menu.
- Last Name: Enter the Last Name of the user. A combination of First Name and Last Name will be shown for entering the user menu explained in The User Menu.
- E-Mail: Specify the user’s email address. This address will also be used when requesting automated reports via email.
- Company: The name of the company the user works for.
Language
- German or English: Choose the language used for the user’s interface. You can either select German or English
- Decimal Separator: Insert here the character you want to use for separating decimal places from numbers.
- Thousands Separator: Insert here the character you want to use as thousands separator.
Administrative Permissions
Choose the additional administrative permissions you want to assign to the user. You can choose an arbitrary combination of permissions or none at all. The additional rights the user will receive through administrative permissions are explained in User Roles.
Licensing Details
Choose the license you want to assign to the user. You can either choose "Viewer License", "Analyst License" or both. The rights the user will receive through the different licenses are also explained in User Roles.
Interacting with an existing user
To interact with an existing user, you have three options:

Figure 5.3: Edit an existing user / Group assignment of the user / Delete user
Edit an exiss ting user
To edit an existing user, simply click on the ![]() -icon. This will redirect to the same window, as shown in Figure 4.2.
-icon. This will redirect to the same window, as shown in Figure 4.2.
Group assignment
If you ordered your users in groups, you can assign the user to a group with the ![]() -icon. Tick all "Member" boxes for all groups, that you wish to assign the user.
-icon. Tick all "Member" boxes for all groups, that you wish to assign the user.
Delete user
To delete an existing user, click on the ![]() -icon.
-icon.
Manage Groups
The utilization of user groups will help you to implement security and access regulations. Instead of administrating accesses to warehouses, cubes and analyses on an individual user basis, you will be able to reproduce your organizational structure and grant rights to several users at once. In order to be able to assign users to user groups, user groups need to be created at first. This can be done in the “Group Management” section. A simple click on "Group Management" in the top right corner of the User Management page, will redirect you to the Group Management.
To edit an already existing group, select it from the group list and hit the ![]() -icon. You can change the name of the group, as well as add a description.
-icon. You can change the name of the group, as well as add a description.
To assign users to a group, use the ![]() -icon. The
-icon. The ![]() -icon will delete the user group with all corresponding user assignments.
-icon will delete the user group with all corresponding user assignments.
For adding a new group, click on  .
.
To get back to the User Management, hit "User Management".
Generated Groups/Generated Users
It might occur, that you see two additional options in the top right corner of the User/Group Management, named Generated Users/Generated Groups.
These include users or groups, that have been assigned additional features, that extend the regular features of SAP Process Mining by Celonis 3, and are customized by Celonis.
By default, no generated users or groups are assigned.
If you wish to have further information, please consult your personal agent or our servicedesk.