Data Models are collections of tables that can be connected and that contain information about the same purpose of analysis (e.g. information concerning P2P processes structured within several tables). The tables available for creating a new Data Model depend on the Data Store that is chosen as data source during the creation of the Data Model.
Once you have chosen a Data Store from the Data Store list on the left side of the Data Management entry screen, all Data Models available within the Data Store will be listed right next to it.
Create Data Model
To create a new Data Model click on the "Add new"-button in the top right corner of the Data Management screen and choose "Create Data Model" . This will lead you to another screen where information for the Data Model needs to be given.
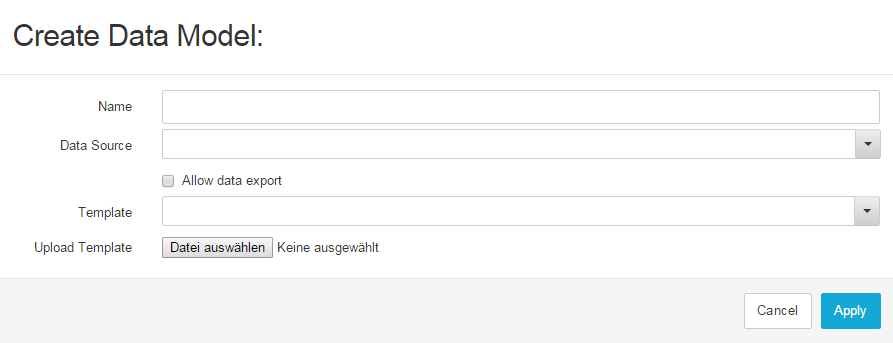
Figure 4.4: Create Data Model
- Name: Specify the name for your Data Model. The name should be meaningful, describing the purpose of the data contained in the model.
- Data source: Choose the Data Store you want to use as Data Source for your model. You will be able to choose between all the Data Stores that you have access to. The tables available for selection will depend on the Data Store you use.
- Allow Data Export: If this option is enabled, the data contained in the Data Model can be exported and used within other applications or SAP Process Mining by Celonis systems.
- Template Cube: If you do not want to create your Data Model from scratch, choose one of the templates from the template list (please note that at least one of the already available Data Models needs to be marked as template in order to have any list entries here). The settings and tables from the Data Model used as template will then be applied to the new Data Model.
Click in “Apply” in the bottom right corner to save your changes. Afterwards, the new Data Model will appear in the Data Model list of the respective Data Store.
Configure Data Model
The creation of a new Data Model is only the first step for achieving a functioning data cube. In the next step, during the configuration, you now need to specify tables and establish connections via foreign keys in order to optimally use your Data Models for analyses.
You can enter the Data Model configuration menu by clicking on one of the Data Models in the list. Afterwards you will be forwarded to the Data Model configuration screen shown in Figure 5.3.
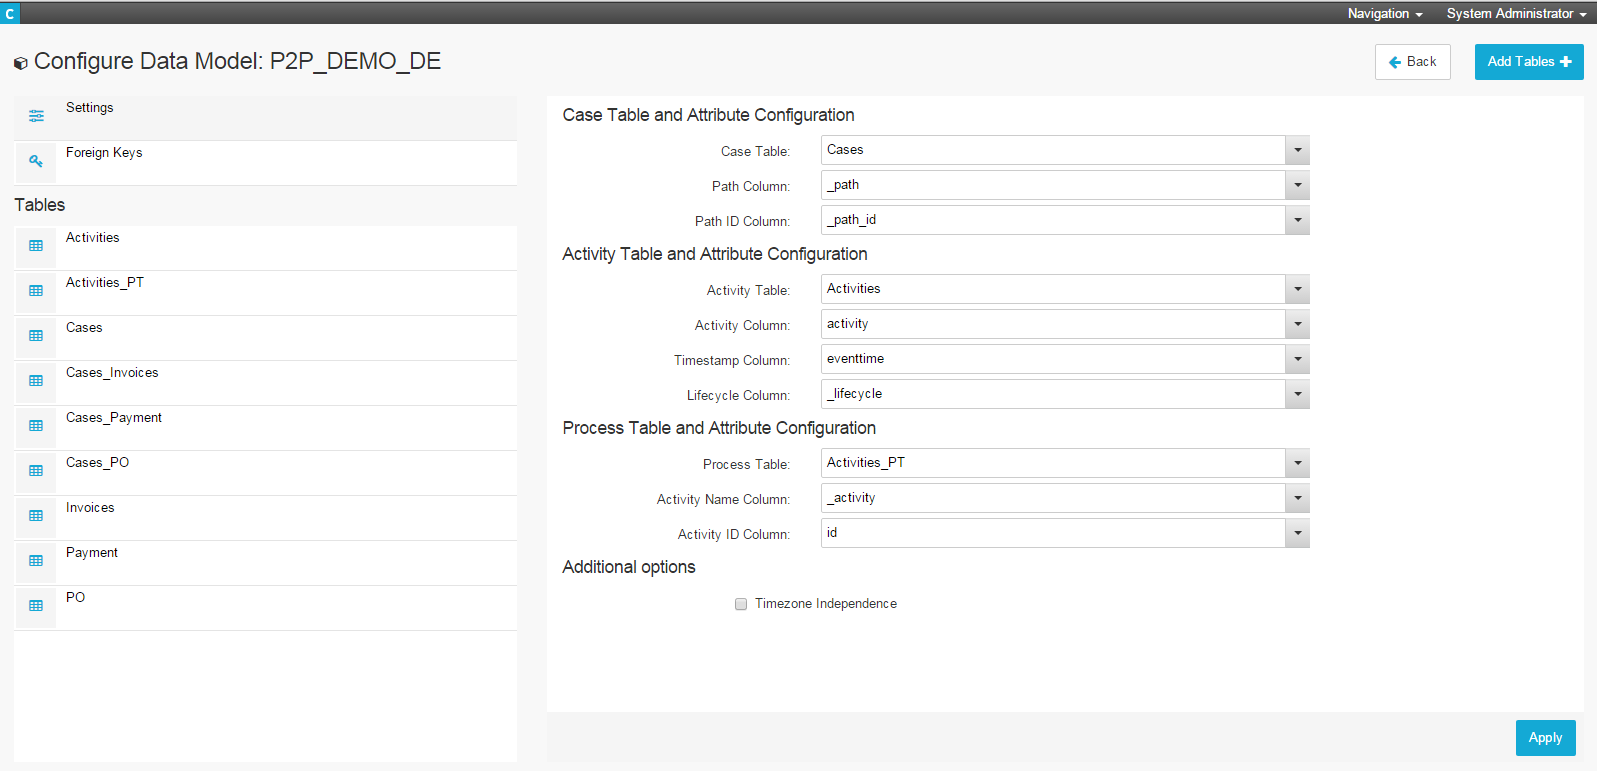
Figure 4.5: Data Model Configuration
Settings
The first screen of the Data Model configuration menu contains the settings. Here you need to specify the basic tables and columns needed for creating the process model.
Each Data Model should at least contain three tables: The Case Table, the Activity Table and the Process Table. The Cases table contains all available cases with their paths (meaning the individual sequence of activities for each case) and the id of the path. The Activity Table contains an entry for each activity of each case including the activitiy’s name, the eventtime (timestamp of the activity) and the lifecycle number (position of the activity in the case’s lifecycle).
In the settings, you need to specify which tables of your Data Model take the role of the Case, Activity and Process Table as well as in which columns of these tables the required information is stored. Simply click on the grey field in each row to choose tables from the table list at first and then select the respective columns afterwards. Click on “Apply” in the bottom right corner once you’re finished.
If there are any warnings or errors occurring in your Data Model (such as missing Foreign or Primary Keys within tables), they will also be announced in the Settings section of the configuration menu. Warnings and errors will appear below the selection options for Case, Activities and Process tables.
Foreign Keys
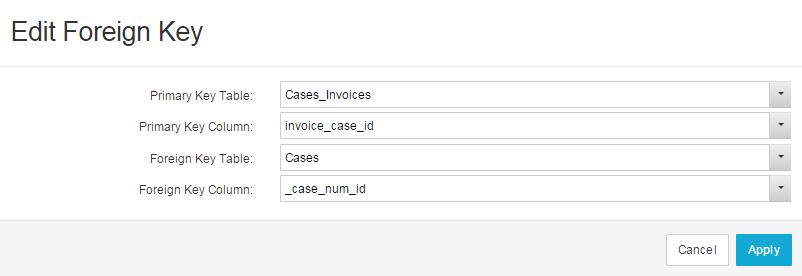
Figure 4.6: Edit Foreign Key
In order for your Data Model to work with dynamic filtering, you need to configure connections between tables using Foreign and Primary Keys. One essential connection you always need to configure is the one between the Activity and the Case Table. Depending on the number of tables within your Data Model, the number of Foreign Keys you need to configure will grow. In order for dynamic filtering to work, each table needs to have a connection to the Case Table (which again is connected to the Activity Table). However, tables do not need to directly be connected to the Case Table but can be connected indirectly (e.g. if Table 1 is connected to the Case Table and Table 2 is connected to Table 1, Table 2 does not need to have a direct link to the Case Table).
There are four fields that need to be filled with information when a new Foreign Key is created: PK Table, PK Column, FK Table and FK Column. If you want to connect two tables, at least one of them needs to contain a primary key that is unique for each row in the table. The other one needs to contain a foreign key pointing to the primary key of the first table and linking each row of the second table to one of the rows of the first one. In the fields PK Table and PK Column, the table and column containing the primary key are selected. The fields FK Table and FK Column should be filled with the table and column containing the foreign key. Once all the entries have been made, click on “Apply” in the bottom right corner of the screen to save your settings.
Tables
Right below the menu item "Tables" you will find a list of all tables available within the Data Model. Clicking on one of them will open the table settings menu on the right side of the screen.
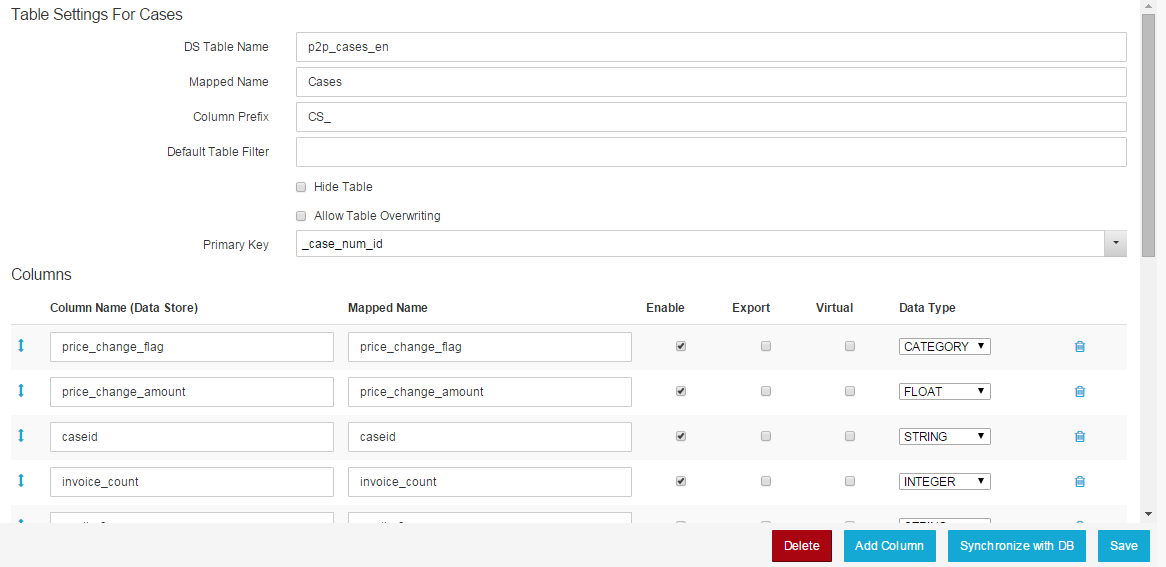
Figure 4.7: Table Settings
Table Settings
- DS Table Name: This field contains the name of the table as specified in the database your Data Store is linked to. The field will normally be filled automatically.
- Mapped Name: Since the table names used in databases often are not very user-friendly, you can specify a more easily readable name for the table.
- Column Prefix: Specify here a prefix used for the columns in the table.
- Default Table Filter: If you want to limit the data of your table that is available for analyses you can specify a general filter (e.g. only allow entries that have been made after a certain date). Please note that the filter will be used for all the documents containing the table and cannot be changed from within analyses.
- Hide Table: If this field is enabled, the table will be hidden within analyses meaning that it cannot be used as data source for analyses components.
- Primary Key: Select the column that serves as primary key for the table. The primary key is used to uniquely identify each entry of the table and therefore should be different for each row.
Columns
In the columns section all the columns available in the table you selected are displayed and settings can be made. The first section shows the original column names of the table as saved in the database. These fields are normally filled automatically and do not need to be changed. Right next to them you can specify mapped names for each column. By default, the column names as specified in the database will be entered. However, you can choose to assign a more easily understandable name to each column which will then be displayed when creating analyses.
Right next to the mapped names you will find three columns titled with “Enable”, “Export” and “Virtual”. By using the checkboxes in the first one, you can decide which columns you want to provide for usage in analyses and which ones you want to hide from the user interface. In the second one – “Export” – you can choose for which columns data export is allowed.
The last field “Data Type” allows you to set the data type of the column. However, data types will be determined automatically based on the specifications made in the database and you usually do not need to make any changes to these settings.
Right next to the “Data Type” settings, you will find a small rubbish bin icon. Clicking on it will delete the respective column from the table.
Delete Table, Add Column, Synchronize with Database and Save
At the bottom of the Table section, you will find four buttons: “Delete”, “Add Column”, “Synchronize with DB” and “Save”. Using the first one will delete the whole table from the Data Model. The second one will add another, empty column to it. With “Synchronize with DB” you can update the Data Model to any changes you might have made in the underlying database. The tables in the Data Model will be compared to the ones in the database and will be adapted to any differences that might exist between them. With the last one – “Save” – changes you made to the Data Model will be saved permanently.
Share, edit, delete or download Data Model
If you have created a Data Model or the respective rights have been granted to you by the creator of the Data Model, you will see a range of different symbols next to teach Model in te Data Model list (see Figure 5.4). In parts, the functions of the different symbols should already be known from the handling documents (as explained in Handling Documents).

Figure 4.8: Share, edit, delete or download Data Model
Share Data Model
Data Models can be shared with single users ![]() or groups of users
or groups of users ![]() . Sharing Data Models is essentially the same as sharing Documents. When clicking on the icon for “Share with User” or “Share with Group”, a small menu will appear allowing you to enable or disable rights for each user or group. You can choose between read, write or admin rights.
. Sharing Data Models is essentially the same as sharing Documents. When clicking on the icon for “Share with User” or “Share with Group”, a small menu will appear allowing you to enable or disable rights for each user or group. You can choose between read, write or admin rights.
- Read: The user/group will only be able to view the data model and use it as data source for analyses but will have no rights to modify it.
- Write: The user/group will be able to edit the Data Model settings (such as the data store used as source) and the Data Model configuration.
- Admin: The user/group will have full access and will be able to edit, share and even delete the Data Model.
Edit Data Model
By clicking on the ![]() -icon you can change the settings made upon creation of the Data Store (as explained in Data Stores). In addition, you will now be able to upload templates for the already created Data Model and to label the selected Data Model as template by clicking on on “Promote to Template”. Afterwards the Data Model will be shown as template in the template list you can choose from when creating a new Data Model. Make your changes and click on “Apply” to save them.
-icon you can change the settings made upon creation of the Data Store (as explained in Data Stores). In addition, you will now be able to upload templates for the already created Data Model and to label the selected Data Model as template by clicking on on “Promote to Template”. Afterwards the Data Model will be shown as template in the template list you can choose from when creating a new Data Model. Make your changes and click on “Apply” to save them.
The edit icon will only appear if you are the owner of the Data Model (meaning you created it) or if write or admin rights have been granted to you by the owner.
Delete Data Model
By clicking on the ![]() -icon your Data Model will be deleted and removed from the Data Model list. The deletion of Data Models is irreversible so be sure about your decision. A warning message will appear, asking you if you really want to permanently delete the Data Store.
-icon your Data Model will be deleted and removed from the Data Model list. The deletion of Data Models is irreversible so be sure about your decision. A warning message will appear, asking you if you really want to permanently delete the Data Store.
The rubbish bin icon will only appear if you are the owner of the Data Model (meaning you created it) or if admin rights have been granted to you by the owner.
Download Data Model
By clicking on the ![]() -icon your Data Model will be downloaded to your local device. It will be saved in a SAP Process Mining by Celonis readable format and you can use it e.g. to upload a Data Model to anothoer SAP Process Mining by Celonis instance.
-icon your Data Model will be downloaded to your local device. It will be saved in a SAP Process Mining by Celonis readable format and you can use it e.g. to upload a Data Model to anothoer SAP Process Mining by Celonis instance.