In SAP Process Mining by Celonis there are some filter components available, allowing you to provide easy filtering mechanisms for the viewers of your analysis. These include the Search Field, the Dropdown, the Attribute Filter and the Time Filter which will be described in the following sections.
Search Field
Adding a Search Field to your analysis will allow viewers to filter components based on text expressions they enter into the field. Once you decided on implementing a Search Field, you will see the Search Field Configuration Menu as shown in Figure 3.16.

Figure 3.16: Search Field Configuration Menu
For viewers of your analysis to be able to use the Search Field, you will have to specify the data basis they can search in. This will be done by choosing an arbitrary amount of columns from the tables of your data cube. If values are entered into the Search Field, they will only be matched with the entries contained in the columns you selected during the configuration.
In the configuration menu, you will see two different lists. “Table” contains a list of all the available tables you can choose columns from. The list of available tables depends on the data cube you chose when creating your analysis document (as explained in Creating an Analysis). Once you selected a table, the “Column” list on the right side of the menu will show all the columns available for selection. To add one of these columns to the data basis of your Search Field, just click on the desired column. Note that it is also possible to mix columns from different tables!
Dropdown
A Dropdown Field will give the viewers of your analysis the option to choose values for filtering from a dropdown list. The values available will depend on the data you select as a basis for the Dropdown Field during its configuration. The different options available during configuration will be explained in the following sections.
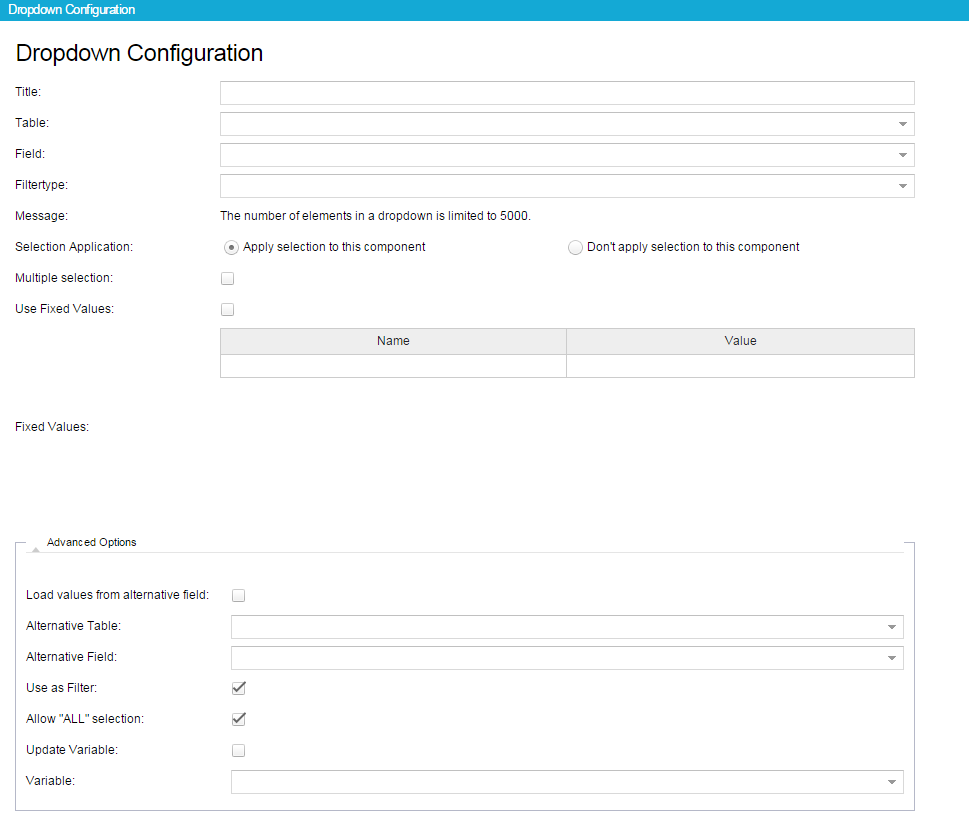
Figure 3.17: Dropdown Configuration Menu
Basic Options
- Show border: Choose this option, if you want to show a border around your filter component.
- Title: Please set a title for your Filter.
- Table: Select the table containing the column you want to use as a basis for the Dropdown Field. Depending on the choice made here, the options available in “Field” will adapt. The list of available tables depends on the data cube you chose when creating your analysis document (as explained in Creating an Analysis).
- Field: Here, all the columns available within the table you selected in “Table” will be listed. Choose the column you want to use as data basis for the Dropdown Field. All values contained within the column will then be presented as options for filtering when viewing the analysis.
- Field-Type: Choose the type of data, that you want to filter. You can choose between Date, Integer, Float, String
- Selection Application Although the dynamic adaptation of all analysis components to a filtering selection made is one of the most powerful features in SAP Process Mining by Celonis , sometimes you might want to exclude single components from adapting to filters. By activating “Don’t apply selection to this component”, the component will become insensible to selections made within other components. However, by default “Apply selection to this component” will be enabled to allow the component to adapt to dynamic filtering.
- Multiple Selection: By activating this option, user can select multiple entries from the Dropdown list.
- Use Fixed Values: Activate this option, if you wish to use fixed values.
- Fixed Values: To filter for fixed values, enter these values in the table. Enter a name, which will show up in the Dropdown Filter. For filtering purposes, the value entered in the right column will be used. Please note, that through using fixed values, only values entered in this table will be shown in the Dropdownfilter.
Filters
In the lower right corner of the Dropdown Filter configuration menu you will find the Filters button.
The Filters button is available in most components and gives you the possibility to define a filter that will be applied only to this component. If you apply a filter, only the data conforming to the filter criteria will be chosen as basis for the component. For the definition, any statement made in PQL Syntax can be used.
Attribute Filter
With the help of Attribute Filters it is possible to set a filter on single columns and limit the range of the values considered for filtering. For columns containing numeric values for example, you can choose to limit results to values greater or lesser than a threshold you define. For string values it is possible to retrieve only results that match the given string value or to invert the filter and retrieve those results that do not match it. The options available for configuring the Attribute Filter will be explained in the following sections.
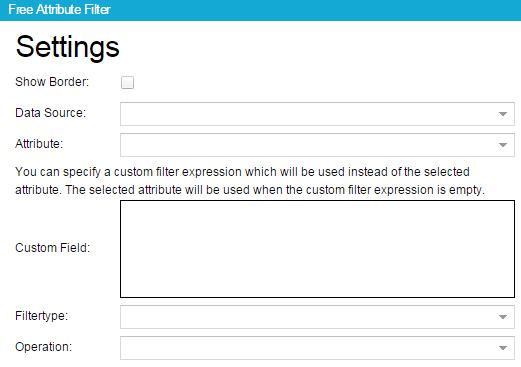
Figure 3.18: Free Attribute Filter Menu
Configuration Options
- Data Source: Select the table containing the column you want to use as a basis for the Attribute Filter. Depending on the choice made here, the options available in “Attribute” will adapt. The list of available tables depends on the data cube you chose when creating your analysis document.
- Attribute: Here, all the columns available within the table you selected in “Data Source” will be listed. Choose the column you want to use as data basis for the Attribute Filter. Depending on the data type of the values stored within the column, the value inserted in “Filtertype” will adapt.
- Custom Field: Specify a custom filter expression which will be used instead of the selected attribute. Any statement made in PQL Syntax can be used. If no custom filter is specified, the selected attribute will be used instead.
- Filter Type: Here, the data type of the attribute selected above is shown. Depending on the data type, the operations available will vary. Normally no changes need to be applied to this field.
- Operation: Choose the operation you want to apply to your selected attribute. Depending on the data type of your attribute, different options are available.
- Value: This field only appears after you selected an operation. Choose here the value you want to compare the selected attribute against using the operator you specified in the previous field. Depending on the data type of your attribute, indicated in the “Filtertype” field, values need to be given as either numerical, string or data types.
Filters
In the lower right corner of the Attribute Filter configuration menu you will find the Filters button.
The Filters button is available in most components and gives you the possibility to define a filter that will be applied only to this component. If you apply a filter, only the data conforming to the filter criteria will be chosen as basis for the component. For the definition, any statement made in PQL Syntax can be used.
Time Filter
The Time Filter allows users of your analysis to filter data rapidly according to time criteria. The filter will appear in the form of buttons labeled with whatever time aggregation you chose for the filter (e.g. years, quarters, months). An example can be seen in Figure 3.20.

Figure 3.19: Time Filter Appearance in Analysis
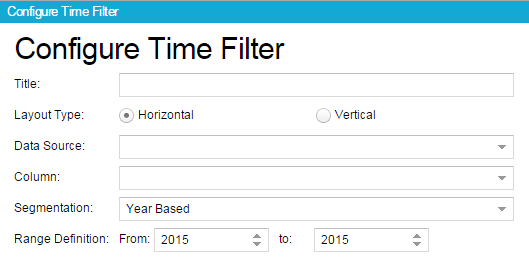
Figure 3.20: Configure Time Filter Menu
Configuration Options
- Data Source: Select the table containing the column you want to use as a basis for the Time Filter. Depending on the choice made here, the options available in “Column” will adapt. The list of available tables depends on the data cube you chose when creating your analysis document (as explained in Creating an Analysis).
- Column: Depending on the table you chose as data source, all columns containing date types within that table will be available for selection in this field. Choose the column you want to use as data basis for the Time Filter.
- Segmentation: Choose the level of aggregation you want to apply to the data. You can choose to aggregate on years, quarters, months, weeks or days.
- Range Definition: Depending on your selection in “Segmentation” you will need to choose a range for the time values. This will be necessary when segmenting into years, weeks or days.
Filters
In the lower right corner of the Time Filter configuration menu you will find the Filters button.
The Filters button is available in most components and gives you the possibility to define a filter that will be applied only to this component. If you apply a filter, only the data conforming to the filter criteria will be chosen as basis for the component. For the definition, any statement made in PQL Syntax can be used.